Loft and Attic spray foam removal is a job that needs to be done by someone who knows what they are doing. It is not something you can do yourself over the weekend. If you do it wrong you can damage the rafters keep moisture trapped or make the roof worse than it was before you even started. But if you do Loft and Attic spray foam removal right you can make the air flow better stop moisture problems that many UK homeowners have to pay for and give surveyors and lenders a roof that’s easy to inspect again. Loft and Attic spray foam removal is a job that requires a lot of care.
This guide explains the professional Loft & Attic process used by foam insulation removal experts across the UK, including what happens on site, what good contractors measure, and why the method changes depending on open cell spray foam removal or closed cell spray foam removal. You’ll also see where costs come from, why mortgage spray foam removal UK cases need extra paperwork, and what “attic roof cleaning and restoration” should actually include. The focus phrase you’ll see most here is spray foam removal, because that’s what you’re buying: controlled, documented removal that leaves the Loft & Attic roof structure safe, dry, and easy to inspect.
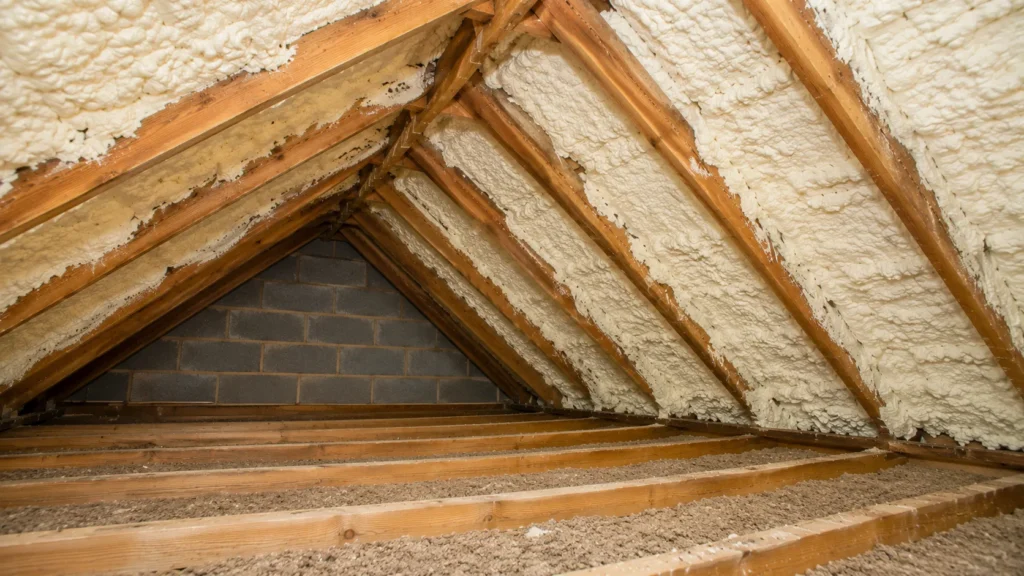
Why Loft & Attic spray foam causes issues in UK roofs
Spray foam insulation problems usually start the same way. Someone wanted a warmer Loft & Attic and a lower heating bill. The installer sprayed foam over the underside of the roof covering and between timbers. The Loft & Attic felt snug. Then the problems turned up later, often during a sale or remortgage.
Here’s what professionals see again and again.
- Moisture gets trapped.
- Timber can’t dry.
- Felt and battens become hard to inspect.
That’s the root of a lot of spray foam roof damage UK surveyors flag. Some foam systems block natural air paths. Some cover defects you’d normally spot early. Some bond so well that later removal needs specialist tools and controlled waste handling. In Loft & Attic spaces, ventilation matters more than most homeowners think. If the roof can’t breathe, the Loft & Attic becomes a moisture box. Condensation risk rises. So does timber decay risk. And once you’ve got roof timber damage spray foam can hide it until it’s expensive.
The first rule: treat it as a roof project, not an insulation job
A proper Loft & Attic removal starts with the roof, not the foam. Insulation removal contractors UK homeowners should trust will always look at ventilation routes, moisture levels, and timber condition before they touch a blade. If you’re dealing with a lender or buyer, you also need evidence. That’s why a spray foam survey UK report often comes first. It tells you what foam you have, where it is, how it’s bonded, and what the safest removal method looks like for that specific Loft & Attic.
Open cell vs closed cell changes everything
Open Cell Spray Foam Removal is usually less dense and can sometimes be separated with less timber loss, though it can still cling hard in places. Closed cell spray foam removal is denser, tougher, and can bond aggressively to rafters, sarking boards, and felt. It can also hide damp marks by sealing surfaces. A real contractor won’t guess. They’ll identify the system, map coverage, then plan the Loft & Attic removal around your roof’s structure and condition.
Loft & Attic pre inspection and survey process
This stage decides whether the job is straightforward or risky. Skip it and you’re gambling with your roof.
Site visit and access check
The team goes into the Loft and Attic to check things. They check the access to the Loft and Attic, the size of the hatch, how high the ceiling is, if there is lighting and if they can work safely. The team also looks for things, like cables, downlights, water tanks and plasterboard that can break easily. They want to make sure the Loft and Attic are safe to work in.
Small detail. Big impact.
If access is poor, time goes up. So does spray foam removal cost UK homeowners end up paying.
Moisture checks and timber assessment
Good professional insulation removal UK firms don’t just “look dry”. They measure. Expect moisture readings on rafters and key junctions. Expect a visual check for staining, mould, softened timber, and corrosion on nails or fixings. If the Loft & Attic has roof moisture problems UK contractors should find the cause, not just clean the symptom. Blocked vents. Failed underlay. Bathroom extract dumping into the Loft & Attic. These are common.
Ventilation review and plan
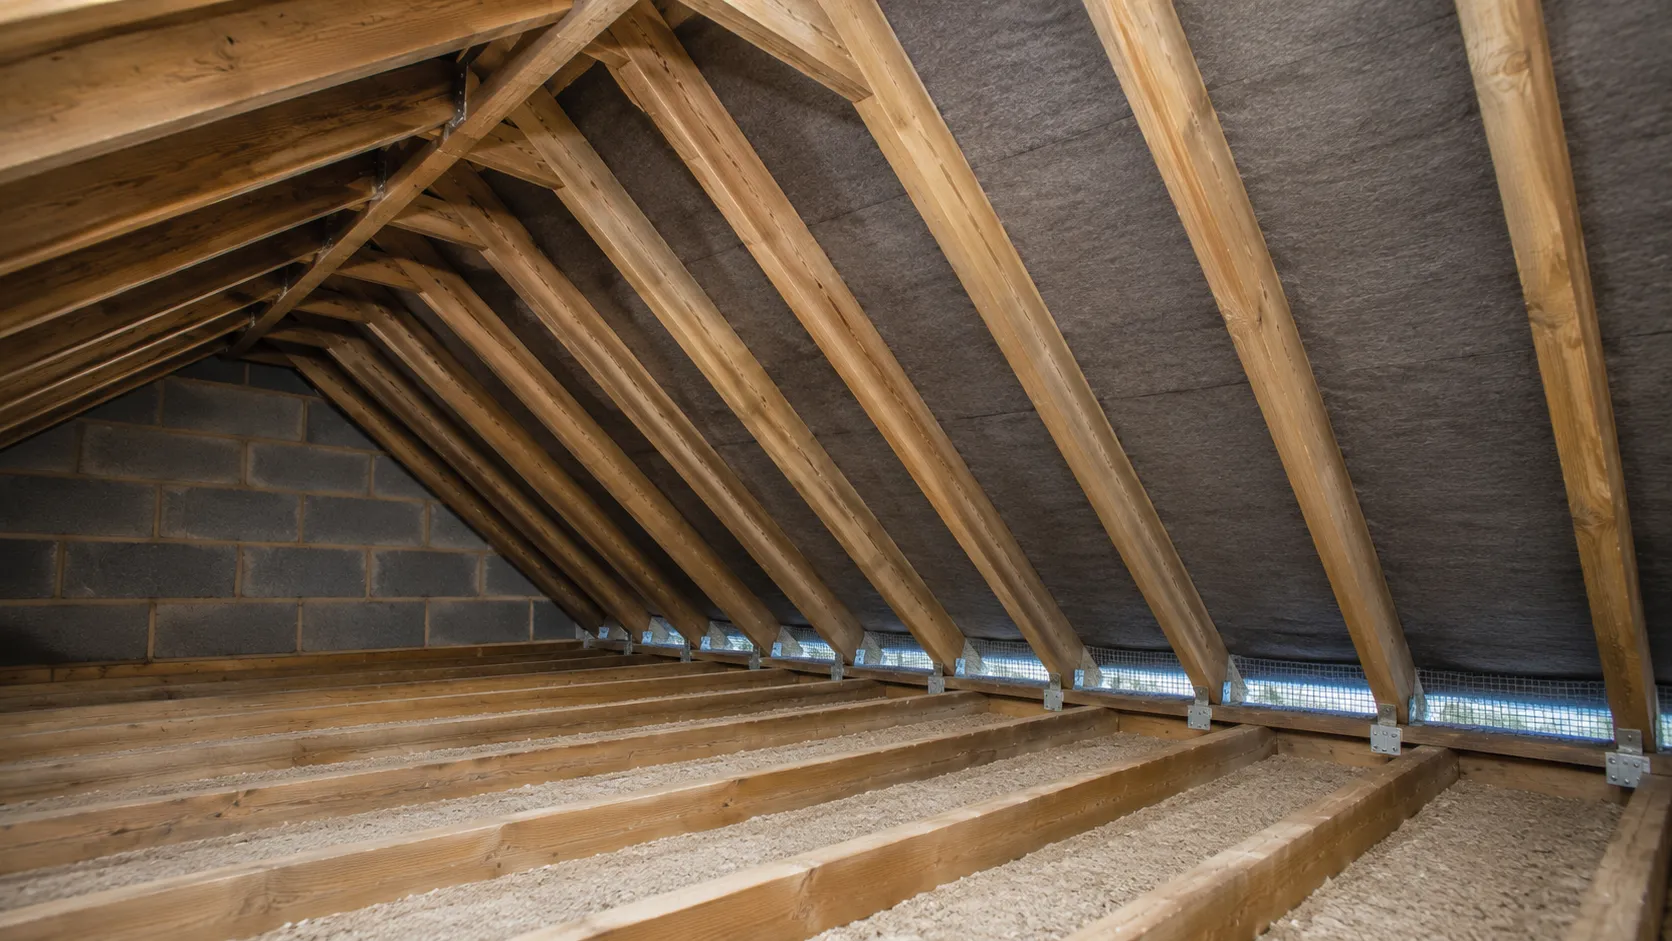
Loft ventilation restoration isn’t a buzz phrase. It’s the difference between a roof that lasts and a roof that rots. The team identifies existing vents, ridge ventilation, soffit vents, tile vents, and any blocked air paths. Then they plan how to restore airflow once the spray foam removal is complete. Sometimes that includes adding vents. Sometimes it means reopening paths the foam has sealed.
Documentation for mortgages and sales
Mortgage spray foam removal UK cases live and die on paperwork. Lenders and surveyors want proof the Loft & Attic is inspectable and the foam is removed properly.
- A strong contractor will offer:
- A survey report, photos, and a written scope.
- A method statement and waste notes.
- After photos and a completion statement.
If you want a baseline for waste duties in England, read the UK government guidance on your Duty of Care for waste. That matters because spray foam waste must be handled correctly, especially once it’s mixed with timber scrap, dust, and contaminated debris.
Loft & Attic spray foam removal process step by step
This is what a professional job looks like on site. The order matters.
Step 1: Protect the home and set up safe working
Before any roof spray foam removal starts, the team protects your landing, stairs, and rooms below. Dust control is not optional in a Loft & Attic. Foam debris travels.
Typical setup includes:
- Sealed sheeting at the hatch and work zone.
- Extraction or filtered vacuum systems.
- PPE suited to the foam type and dust load.
- Safe lighting and boarding.
You want clean work. You also want safe work.
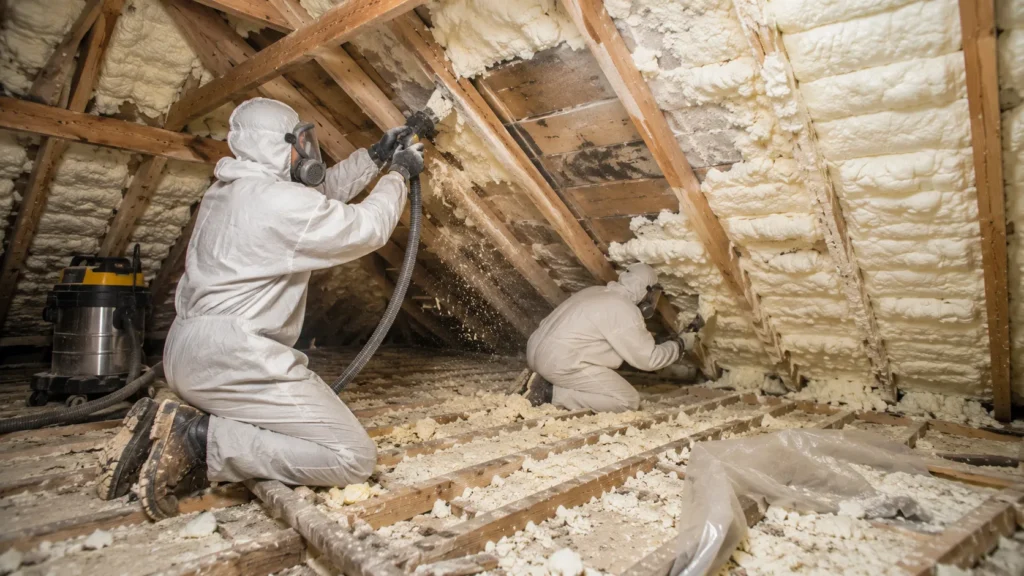
Step 2: Identify the foam and confirm the method
Even if a survey was done, crews confirm what they see. They check foam depth, coverage, and bonding. They also check whether the foam bridges vents or covers wiring. If the foam is a closed cell and really stuck to the rafters we have to be careful and use a tool to remove it. We also have to be gentle in some areas and replace the wood where it is needed. If the foam is cell we can be a little more gentle when we remove it but we still have to be careful and do it the right way, with the foam.
Step 3: Controlled removal from timber and roof underlay
This is the main event. Spray foam removal UK contractors use a mix of techniques depending on foam type and where it sits.
In Loft & Attic work, the risk areas are:
- After edges and junctions.
- Sarking boards and felt.
- Nails, straps, and fixings.
- Dormer cheeks and valleys.
The goal is simple to say and hard to deliver: remove spray foam insulation safely while keeping the roof structure sound and leaving surfaces inspectable.
What “inspectable” really means
Inspectable means you can see the timber grain, joints, and defects. It means you can spot damp staining and splits. It means a surveyor can judge conditions without guessing. That’s why attic spray foam removal should never leave thick residue blankets across rafters. A light trace can be normal in tough areas, but a smeared mess will still raise questions with surveyors.
Step 4: Waste capture and removal
Foam debris, dust, and contaminated scraps must be contained. Insulation removal contractors UK homeowners hire should provide waste transfer notes and clear disposal routes. This is part of professionalism. It also protects you if questions come up later during a sale.
Step 5: Attic roof cleaning and restoration
Once the foam is off, you’re left with dust, fragments, and sometimes sticky residue. Proper attic roof cleaning and restoration means:
- Vacuuming all bays and ledges.
- Cleaning junctions so vents can work.
- Removing debris from around wiring and pipes.
- Leaving the Loft & Attic tidy enough to inspect.
If there’s mould, it needs correct treatment. If there’s wet timber, it needs drying time and airflow, not paint.
Step 6: Loft ventilation restoration
This is where many jobs fail. Foam comes off, but the Loft & Attic still can’t breathe.
A strong contractor will reopen air paths and confirm they’re clear. They’ll also tell you if extra vents are needed, and why. If your Loft & Attic has chronic condensation, ventilation is the fix most of the time, not “more insulation”.
Step 7: Final report for your records
At the end you should get a pack you can show to a buyer, a surveyor, or a lender. This is especially important for mortgage spray foam removal UK situations.
Expect:
- Before and after photos.
- Notes on any timber repairs.
- Confirmation of areas treated and cleared.
- Waste documentation.
Keep it. Don’t lose it.
Dormer roofs and awkward builds need a tighter plan
Dormer roof insulation removal is rarely “standard”. Dormers have more junctions, more cold bridges, and more places for moisture to sit. Foam often gets sprayed into tight corners where access is poor.
If you have a dormer, roof spray foam removal has to be slower and more surgical. Ripping foam out can damage membranes and flashings. That creates leaks later, which then gets blamed on “the roof”.
It wasn’t the roof. It was the method.
For Dormer Roof Insulation Removal, choose a team that can show past dormer jobs, explain their access method, and talk plainly about risk areas.
Common signs of spray foam roof damage UK homeowners miss
You don’t always see the problem from the bedroom ceiling. Loft & Attic issues often hide until the right weather hits or the house goes on the market.
Watch for:
- Musty smells after rain or cold snaps.
- Dark staining on rafters or nails.
- Rusting fixings or damp insulation around eaves.
- Condensation on felt in winter.
- Surveyor comments about restricted inspection.
If any of these show up, you’re into roof moisture problems UK territory. Act early. Damage accelerates once timber stays wet.
Spray foam removal cost UK: what drives the price
People want a number. Realistically, costs vary a lot because Loft & Attic roofs vary a lot. Any company quoting blind is guessing.
Price usually depends on:
- Foam type, open cell or closed cell.
- Coverage depth and total area.
- Access, height, and safe working setup.
- How bonded the foam is to timber and underlay.
- Waste volume and handling.
- Whether timber repairs are needed.
- How much loft ventilation restoration is required.
Closed Cell Spray Foam Removal often costs more because it’s harder, slower, and can require more remedial work. If you’re selling or remortgaging, factor in the admin side too. A clean report and photo evidence saves weeks of arguing later.
Choosing the right loft insulation removal services
You want proof, not promises.
A credible team should be happy to explain:
- Their method for removing spray foam insulation safely.
- How they manage dust and waste.
- How they protect wiring and services.
- What they do if they uncover roof timber damage spray foam has hidden.
- What paperwork they provide for surveyors and lenders.
Avoid anyone who talks like it’s quick and easy. It’s not. Professional insulation removal UK work is slow by design. That’s how you protect the roof.
If you need support beyond a standard Loft & Attic job, match the contractor to the problem.
For a sale or remortgage: Ask for a spray foam survey UK and a lender friendly completion pack, then book mortgage spray foam removal UK work with full photos and waste notes.
For visible damp or mould: Book Loft & Attic inspection plus loft ventilation restoration, then proceed with spray foam removal once the moisture route is clear.
For a sale or remortgage: Ask Elite Spray Foam Insulation Removal for a spray foam survey UK and a lender friendly completion pack, then book mortgage spray foam removal UK with full photos and waste notes.
For dormers and complex roofs: Request dormer roof insulation removal planning, including junction checks and careful roof spray foam removal around valleys and cheeks.
For suspected timber issues: Book a roof condition check alongside attic spray foam removal, so any roof timber damage spray foam has hidden gets handled properly.
For visible damp or mould: Book a Loft & Attic inspection with Smart Spray Foam Insulation Removal plus loft ventilation restoration, then start spray foam removal once the moisture route is clear.
FAQs
1) Can I remove spray foam in my Loft & Attic myself?
You can try, but it’s a bad idea. You’ll create dust, damage timber, and still leave residue that blocks inspection. Professional spray foam removal is about control, evidence, and roof safety.
2) Will spray foam removal damage my rafters?
It can if the method is aggressive or rushed. Foam bonds to timber. A good contractor removes it in stages and flags any areas where timber repair is needed.
3) Is an open cell easier to remove than a closed cell to remove?
Usually, yes. Open cell spray foam removal is often less dense. Closed cell spray foam removal is tougher and more strongly bonded, so it tends to take longer and cost more.
4) Why do lenders care about spray foam in the Loft & Attic?
Because foam can block inspection and hide defects. Many lenders want proof the Loft & Attic roof is visible and dry. That’s why mortgage spray foam removal UK jobs need strong documentation.
5) What paperwork should I get after spray foam removal?
Ask for before and after photos, a written scope, waste notes, and a completion statement. If a survey was done, keep that report too.
6) Does removing the foam fix condensation straight away?
Not always. If the Loft & Attic still lacks airflow, condensation can continue. Loft ventilation restoration is often the real fix, with foam removal as part of the wider solution.
7) How long does a typical Loft & Attic removal take?
It depends on foam type, coverage, and access. Small Loft & Attic areas can be quicker. Large roofs with closed cell foam and dormers take longer because careful roof spray foam removal is slow work.